Raspberry Pi as an Access Point
With the release of Raspberry Pi OS Bookworm, based on Debian 12, comes Network Manager to… manage network connections. In this post, I will discuss using Network Manager to set up your Raspberry Pi as a wireless access point. This is a pretty basic setup and does not involve using the Pi as a router. It simply sets the Pi to broadcast its own SSID that can then be directly connected to. From there you can SSH into the device, access a web server hosted on the Pi, and more. In my use case, I have this setup running on my 3D printers so I can directly connect to them and print when away from a known network.
Getting Started
First, we need to be aware of the limitations. Most Raspberry Pi’s only have 2 network interfaces. One for a wired ethernet connection (eth0) and one for a wireless connection (wlan0). Both can be in use at the same time but each interface can only be connected to one network at a time. As an example, the Pi can be connected to the internet via the wired interface and broadcast a hotspot on the wireless interface. However, the Pi cannot connect to a WiFi network and broadcast a hotspot at the same time without an additional wireless interface.
If the Pi being modified is currently accessed via a wireless network, it is imperative the above limitation is understood. Misconfiguration of AP mode and its activation, or deactivation of the current local network connection, can result in being locked out of the Pi. Fortunately, it can be repaired but will require a local terminal at the Pi or other direct connection.
Assuming a Pi is available, flashed with Raspberry Pi OS Bookworm, and accessible via SSH or locally we can get started. Check out my post on Baking a Pi for some help if needed.
I would expect this should work with any system running Network Manager but I don’t have experience.
Don’t forget, best practice is to regularly update your system:
sudo apt update && sudo apt full-upgrade -y
Adding an AP Network
Network Manager can be accessed via the GUI, a command line tool, or modified via command line directly. I chose to use the command line tool.
Use the following command to open the tool:
1
sudo nmtui
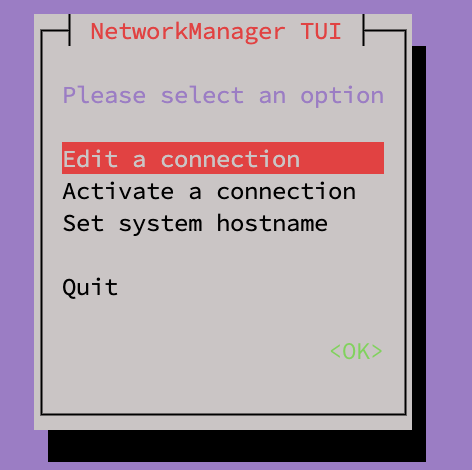
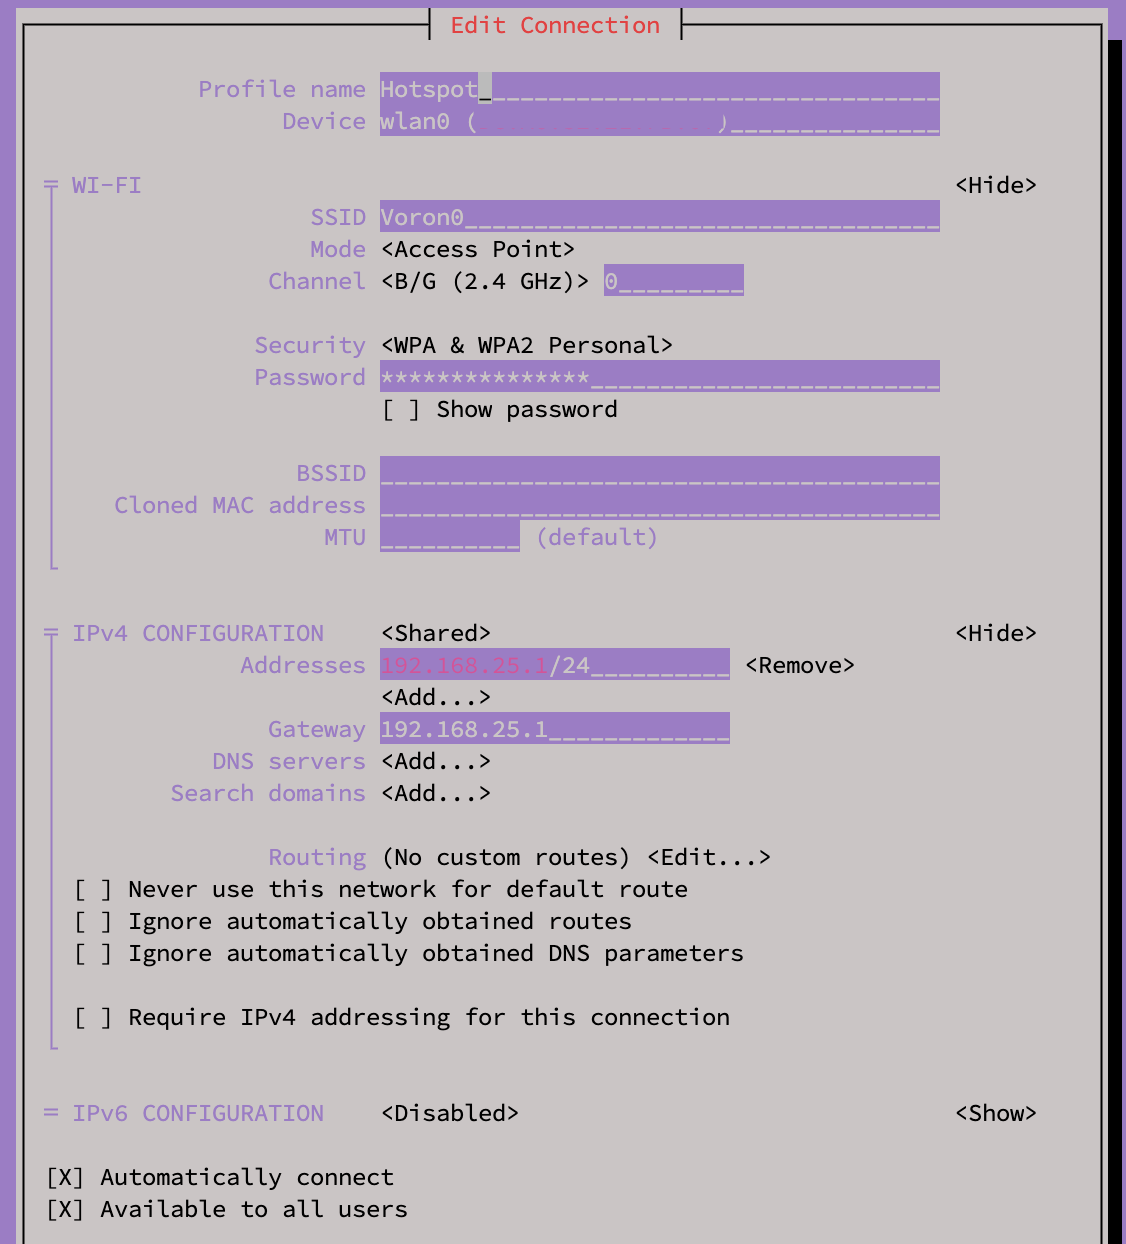
With the tool open, select Edit a connection. The tool will display list of all configured network connections along with some options. The options are self explanatory. In order to add a wireless AP network, choose Add and select Wi-Fi for the type of connection to Create. This menu now allows for all the networks specifics to be added. I have provided some descriptions and a screenshot of my settings below. Change them as needed.
- Profile Name:
- Choose a name for this profile in Network Manager.
- Device:
- The network interface for the AP to use. This should be “wlan0” for the built in wireless interface.
- SSID:
- The SSID for the AP to broadcast
- Mode:
- The mode for this connection. For an AP its “Access Point”.
- Channel:
- The frequency to broadcast the network. B/G (2.4 GHz) provides good compatibility.
- Security:
- The security protocol to use for connecting to the AP.
- Password:
- The password used to connect to the AP. Assuming a WPA Personal security protocol is being used.
- IPv4 Configuration:
- Must be “Shared” for AP configuration
- Address:
- The private IP address range for the network in CIDR notation.
- Gateway:
- The IP address that will be used for this Pi when connected to its network. Think of it like a router’s IP address.
- IPv6 Configuration:
- I don’t use IPv6 so its disabled in my profile.
- Automatically Connect (Jump ahead for more information)
- If selected, this network will automatically connect (broadcast) when the Pi is started.
- Available to All Users
- This limits which users connect (broadcast) to this network.
A wireless AP network is now set up to broadcast from the Raspberry Pi’s integrated WiFi chip. It can be activated from the Activate a connection option on the first page of Network Manager’s command line tool.
Remember, only one wireless network can use the
wlan0interface at a time. If another network connection is in use, it must be deactivated before another other networks can be seen or activated.
Automatic Connections and Network Priority
Before I continue, it’s important to determine a use case for the wireless AP. This helps with setting the Automatically connect status and with prioritizing network connections.
In the simplest case, the Pi will have no need for a wireless connection to another network. Whether that is because the wired interface is used or because it will be an isolated offline device. In this instance, the AP network profile can be set to Automatically connect and all other wireless profiles can be deleted or deactivated.
For my use case, I want to be able to travel with my headless Raspberry Pi but still connect to it when away from a known network. Specifically, I’m using a Raspberry Pi with Klipper to control my 3D printer. While on my home network I can wirelessly SSH, transfer files, and start prints. However, once I take the printer out of my local network’s WiFi coverage I lose this ability. This is where the AP network, automatic connections, and network priority all come into play.
This solution is somewhat rudimentary as it relies on a network being available during the Raspberry Pi’s boot process. It does not constant search for a known network to appear then reconnect. However, it is sufficient for my use.
Setting Network Priorities
To start, I have Automatically connect enabled in both my wireless AP profile and local network wireless profile. Next I need to directly modify the Network Manager profiles for these networks. Locate the profiles in the following directory:
1
cd /etc/NetworkManager/system-connections
This folder should contain all profiles currently configured in Network Manager using the format *.nmconnection.
Open the AP profile in an editor. Use the name and editor as they pertain to your system.
1
sudo nano Hotspot.nmconnection
Much of the information here should look familiar. It’s all the settings provided during the setup in the command line tool.
1
2
3
4
5
6
7
8
9
10
11
12
13
14
15
16
17
18
19
20
21
22
23
24
25
[connection]
id=Hotspot
uuid=######-####-####-####-#########
type=wifi
interface-name=wlan0
timestamp=1710419109

[wifi]
band=bg
mode=ap
ssid=Voron0

[wifi-security]
key-mgmt=wpa-psk
psk=**********

[ipv4]
address1=192.168.25.1/24,192.168.25.1
method=shared

[ipv6]
addr-gen-mode=default
method=disabled

[proxy]
The above code block is specific to my machine and has been sanitized. Yours should look different.
Under the [connection] heading I added the following lines:
1
2
autoconnect=true
autoconnect-priority=0
These are the default values so I doubt they are actually needed but I wanted the visibility since I will be modifying another network profile in a similar manner. autoconnect=true enables the auto connect feature. autoconnect-priority=0 sets the priority of the networks to connect. The higher the number, the higher the priority. More information on the Network Manager connection settings can be found here.
I followed the same steps as above but this time edited my home network profile and used autoconnect-priority=10. On boot, the Pi will attempt first to connect to my home network. If that is unsuccessful, it will begin to broadcast the AP network.
Connecting to the AP Network
This is pretty straight forward. Once the Pi starts to broadcast its wireless network, any device should able to see it as an available WiFi network and connect using the specified authentication method and password.
The Pi will automatically assign your device, client, an IP address from the range specified during the configuration. The Pi itself will have the Gateway IP address specified during configuration. In the examples above I used 192.168.25.1.
The Pi should be fully accessable the same as if it was connected to a local network via router. Any web servers can be accessed by punching in the IP and specified port in the browser window. VNC if enabled should work using that Gateway IP. SSH access also works the same. For example:
1
ssh pi@192.168.25.1
Next Steps
This is a pretty basic outline of how to get a wireless AP network running on the Raspberry Pi using Network Manager. It also covered prioritizing and automatically starting connections. Much more can be done with an AP network. Things like building a router, WiFi extender, and more. Determine the use case for a project and build on from there.

